set date_str=%date:~,4%%date:~5,2%%date:~8,2%
set time_hh=%time:~0,2%
if /i %time_hh% LSS 10 (set time_hh=0%time:~1,1%)
set data_time_str=%date:~,4%%date:~5,2%%date:~8,2%_%time_hh%%time:~3,2%%time:~6,2%
rar a db_%data_time_str%.rar -m5 -s -r *.bak
@echo off&setlocal enabledelayedexpansion pushd E:\DBbackup set n=0 for /f "delims=" %%a in ('dir /a-d-h /b /o-d shop_lepeng*.rar') do ( if !n! geq 7 del "%%~a" set /a n+=1 ) popd
[root@dev-database ~]# grep "temporary password" /var/log/mysqld.log
2020-10-27T08:30:11.011852Z 1 [Note] A temporary password is generated for root@localhost: iEOu+Tz47m-)
登录mysql
[root@dev-database ~]# mysql -u root -p Enter password: Welcome to the MySQL monitor. Commands end with ; or \g. Your MySQL connection id is 5 Server version: 5.7.32
Copyright (c) 2000, 2020, Oracle and/or its affiliates. All rights reserved.
Oracle is a registered trademark of Oracle Corporation and/or its affiliates. Other names may be trademarks of their respective owners.
Type 'help;' or '\h' for help. Type '\c' to clear the current input statement.
mysql> ALTER USER USER() IDENTIFIED BY 'Liasdvzx@12345'; Query OK, 0 rows affected (0.00 sec)
mysql> grant all privileges on *.* to 'root'@'%' identified by 'Liasdvzx@12345'; Query OK, 0 rows affected, 1 warning (0.00 sec)
sed -e'/./{H;$!d;}' -e 'x;/CREATE TABLE `test`/!d;q' databases-2022-07-08.sql > test.sql
从全备份中导出该表的insert into语句追加到上一个sql文件中
格式:grep -i ‘INSERT INTO 表名‘ 全备sql文件 >> 含建表语句的sql文件
grep -i 'INSERT INTO `test`' databases-2022-07-08.sql >> test.sql
导入到对应的库中
格式: use 对应的库名; source 导出的sql文件;
use test;
source /root/test.sql;
mysql问题
ERROR 1805 (HY000): Column count of mysql.user is wrong. Expected 45, found 43. The table is probabl
mysql> create user 'turn123'@'localhost' identified by 'abc123';
ERROR 1805 (HY000): Column count of mysql.user is wrong. Expected 45, found 43. The table is probably corrupted
postgres=# ALTER ROLE postgres WITH PASSWORD 'Liasdvzx@12345';
ALTER ROLE
将认证方式修改为密码认证,打开
/var/lib/pgsql/12/data/pg_hba.conf

更改为以下配置
# TYPE  DATABASE        USER            ADDRESS                 METHOD

# "local" is for Unix domain socket connections only
local   all             all                                     peer
# IPv4 local connections:
host    all             all             127.0.0.1/32            ident
# IPv6 local connections:
host    all             all             ::1/128                 ident
# Allow replication connections from localhost, by a user with the
# replication privilege.
#local   replication     all                                     peer
#host    replication     all             127.0.0.1/32            ident
#host    replication     all             ::1/128                 ident
host    all             all             0.0.0.0/0              md5
开放远程连接
/var/lib/pgsql/12/data/postgresql.conf

加入以下配置
listen_addresses = '*'
重载配置
postgres=# SELECT pg_reload_conf();
 pg_reload_conf
----------------
 t
(1 row)
alter user postgres with password 'Liasdvzx@12345';
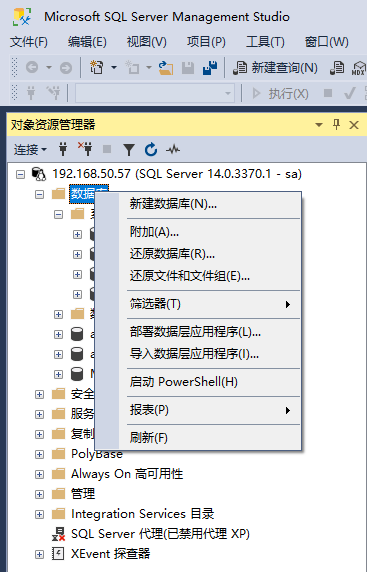
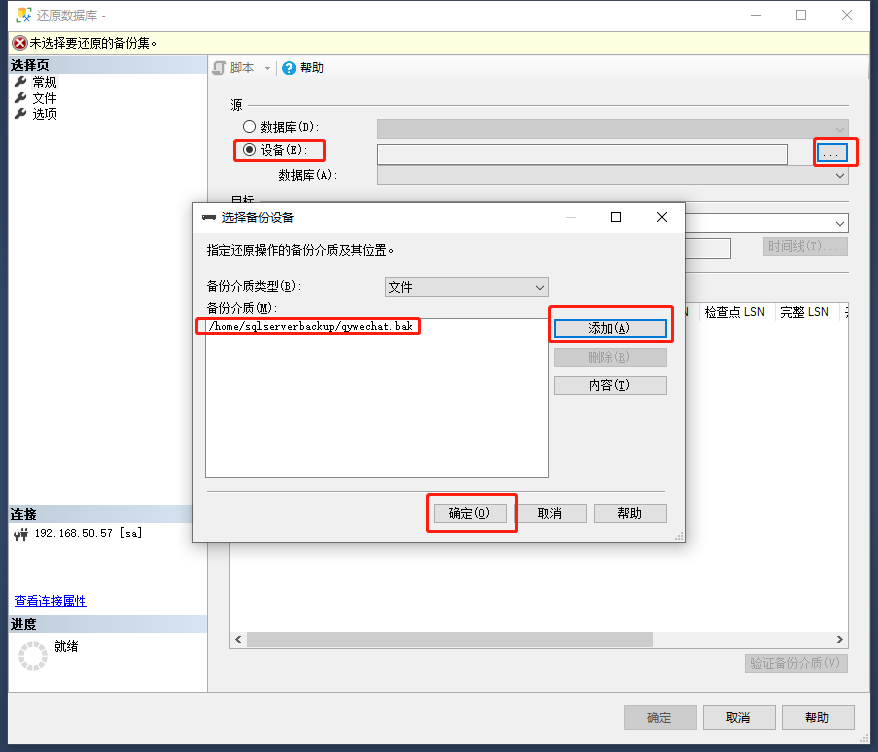
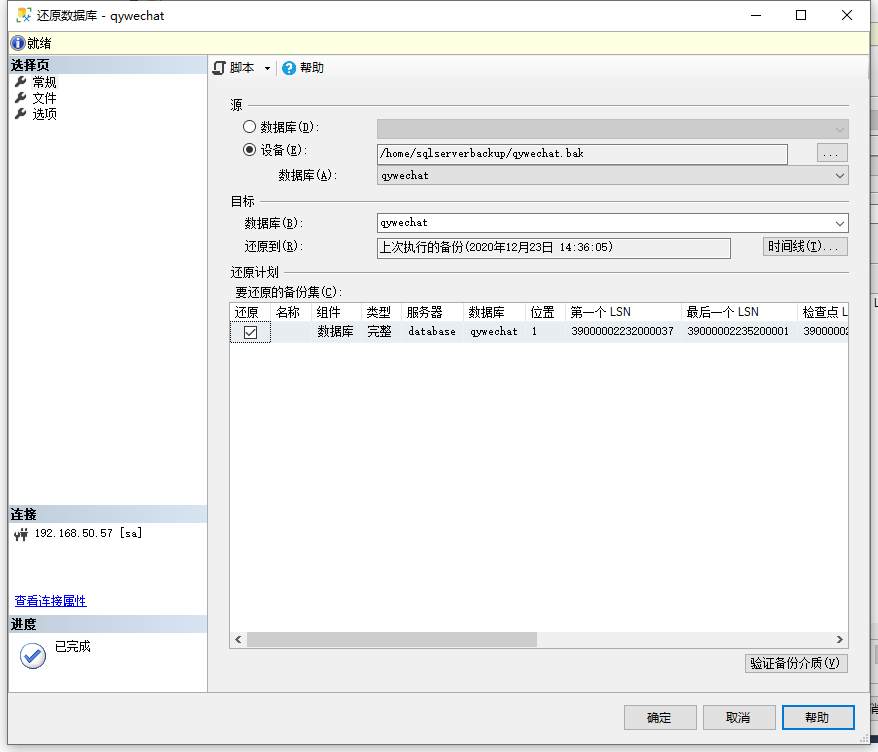
恢复sqlserver
下载sql server的源,便于通过yum命令来安装
[root@dev-database home]# curl https://packages.microsoft.com/config/rhel/7/mssql-server-2017.repo > /etc/yum.repos.d/mssql-server.repo
  % Total    % Received % Xferd  Average Speed   Time    Time     Time  Current
                                 Dload  Upload   Total   Spent    Left  Speed
100   232  100   232    0     0    153      0  0:00:01  0:00:01 --:--:--   153
[root@dev-database home]# cat /etc/yum.repos.d/mssql-server.repo
[packages-microsoft-com-mssql-server-2017]
name=packages-microsoft-com-mssql-server-2017
baseurl=https://packages.microsoft.com/rhel/7/mssql-server-2017/
enabled=1
gpgcheck=1
gpgkey=https://packages.microsoft.com/keys/microsoft.asc
安装
yum install -y mssql-server
配置
[root@dev-database home]# /opt/mssql/bin/mssql-conf setup
Choose an edition of SQL Server:
  1) Evaluation (free, no production use rights, 180-day limit)
  2) Developer (free, no production use rights)
  3) Express (free)
  4) Web (PAID)
  5) Standard (PAID)
  6) Enterprise (PAID)
  7) Enterprise Core (PAID)
  8) I bought a license through a retail sales channel and have a product key to enter.

Details about editions can be found at
https://go.microsoft.com/fwlink/?LinkId=852748&clcid=0x409

Use of PAID editions of this software requires separate licensing through a
Microsoft Volume Licensing program.
By choosing a PAID edition, you are verifying that you have the appropriate
number of licenses in place to install and run this software.

Enter your edition(1-8): 2
The license terms for this product can be found in
/usr/share/doc/mssql-server or downloaded from:
https://go.microsoft.com/fwlink/?LinkId=855862&clcid=0x409

The privacy statement can be viewed at:
https://go.microsoft.com/fwlink/?LinkId=853010&clcid=0x409

Do you accept the license terms? [Yes/No]:
yes

Enter the SQL Server system administrator password:
Confirm the SQL Server system administrator password:
Configuring SQL Server...

ForceFlush is enabled for this instance.
ForceFlush feature is enabled for log durability.
Created symlink from /etc/systemd/system/multi-user.target.wants/mssql-server.service to /usr/lib/systemd/system/mssql-server.service.
Setup has completed successfully. SQL Server is now starting.
查看状态
[root@dev-database home]# systemctl status mssql-server
● mssql-server.service - Microsoft SQL Server Database Engine
   Loaded: loaded (/usr/lib/systemd/system/mssql-server.service; enabled; vendor preset: disabled)
   Active: active (running) since Sun 2021-01-31 16:30:10 CST; 28s ago
     Docs: https://docs.microsoft.com/en-us/sql/linux
 Main PID: 34727 (sqlservr)
   CGroup: /system.slice/mssql-server.service
           ├─34727 /opt/mssql/bin/sqlservr
           └─34747 /opt/mssql/bin/sqlservr

Jan 31 16:30:15 dev-database sqlservr[34727]: 2021-01-31 16:30:15.47 spid19s     SQL Server is now ready for client connections. This is an informational message; no user action is required.
Jan 31 16:30:15 dev-database sqlservr[34727]: 2021-01-31 16:30:15.48 spid8s      0 transactions rolled back in database 'msdb' (4:0). This is an informational message only. No user action is required.
Jan 31 16:30:15 dev-database sqlservr[34727]: 2021-01-31 16:30:15.51 spid11s     Polybase feature disabled.
Jan 31 16:30:15 dev-database sqlservr[34727]: 2021-01-31 16:30:15.51 spid11s     Clearing tempdb database.
Jan 31 16:30:15 dev-database sqlservr[34727]: 2021-01-31 16:30:15.87 spid11s     Starting up database 'tempdb'.
Jan 31 16:30:16 dev-database sqlservr[34727]: 2021-01-31 16:30:16.06 spid11s     The tempdb database has 1 data file(s).
Jan 31 16:30:16 dev-database sqlservr[34727]: 2021-01-31 16:30:16.08 spid22s     The Service Broker endpoint is in disabled or stopped state.
Jan 31 16:30:16 dev-database sqlservr[34727]: 2021-01-31 16:30:16.09 spid22s     The Database Mirroring endpoint is in disabled or stopped state.
Jan 31 16:30:16 dev-database sqlservr[34727]: 2021-01-31 16:30:16.11 spid22s     Service Broker manager has started.
Jan 31 16:30:16 dev-database sqlservr[34727]: 2021-01-31 16:30:16.11 spid8s      Recovery is complete. This is an informational message only. No user action is required.
# network interfaces net: port: 27017 bindIp: 0.0.0.0 # Enter 0.0.0.0,:: to bind to all IPv4 and IPv6 addresses or, alternatively, use the net.bindIpAll setting. #修改绑定ip默认127.0.0.1只允许本地连接, 所以修改为bindIp:0.0.0.0
SELECT pg_terminate_backend(pid) FROM pg_stat_activity WHERE -- don't kill my own connection! pid <> pg_backend_pid() -- don't kill the connections to other databases AND datname = 'databasename'