介绍

Nginx 是开源、高性能、高可靠的HTTP服务器,也可作为反向代理服务器,邮件服务器,支持热部署,占用内存少、并发能力强、能支持高达 5w 个并发连接数,最重要的是Nginx 是免费的并可以商业化,配置使用也比较简单。支持FastCGI、SSL、Virtual Host、URL Rewrite、Gzip等功能。并且支持很多第三方的模块扩展。

Nginx常用功能

Nginx在做反向代理时,提供性能稳定,并且能够提供配置灵活的转发功能。Nginx可以根据不同的正则匹配,采取不同的转发策略,比如图片文件结尾的走文件服务器,动态页面走web服务器。并且Nginx对返回结果进行错误页跳转,异常判断等。如果被分发的服务器存在异常,他可以将请求重新转发给另外一台服务器,然后自动去除异常服务器。

正向代理和反向代理

反向代理(Reverse Proxy)对应的是正向代理(Forward Proxy),他们的区别:
正向代理: 内网服务器主动要去请求外网的地址或服务,所进行的一种行为。内网服务>代理服务器>外网
反向代理:外网要访问内网服务而进行的一种行为。 外网>代理服务器>内网服务
proxy

负载均衡

请求爆发式增长的情况下,单个机器性能再强劲也无法满足要求了,这个时候集群的概念产生了,单个服务器解决不了的问题,可以使用多个服务器,然后将请求分发到各个服务器上,将负载分发到不同的服务器,这就是负载均衡,核心是「分摊压力」。Nginx 实现负载均衡,一般来说指的是将请求转发给服务器集群。
balancer

动静分离

为了加快网站的解析速度,可以把动态页面和静态页面由不同的服务器来解析,加快解析速度,降低原来单个服务器的压力。
一般来说,都需要将动态资源和静态资源分开,由于 Nginx 的高并发和静态资源缓存等特性,经常将静态资源部署在 Nginx 上。如果请求的是静态资源,直接到静态资源目录获取资源,如果是动态资源的请求,则利用反向代理的原理,把请求转发给对应后台应用去处理,从而实现动静分离。
使用前后端分离后,可以很大程度提升静态资源的访问速度,即使动态服务不可用,静态资源的访问也不会受到影响。
DynamicAndStaticSeparation

Master-Worker模式

启动Nginx后,其实就是在80端口启动了Socket服务进行监听

1
2
3
[root@service nginx]# ps -ef|grep nginx
root 146987 1 0 11:18 ? 00:00:00 nginx: master process ./sbin/nginx
nobody 152247 146987 0 14:55 ? 00:00:00 nginx: worker process

Master进程:
读取并验证配置文件nginx.conf,管理worker进程。1024以下的端口只有root用户可以使用

Worker进程:
真正处理请求的进程,是以普通用户的身份进行运行的,这样就可以极大增加程序的安全性。就算是万一有一个进程被劫持,那也不会有管理员权限.注意Worker进程的个数由配置文件决定,一般和CPU个数相关(有利于进程切换),配置几个就有几个Worker进程。

热部署原理:
修改配置文件nginx.conf后,重新加载,master进程会进行语法错误的判断。如果存在语法错误的话,返回错误,不进行装载,如果配置文件没有语法错误,那么ngnix也不会将新的配置调整到所有worker中。而是,先不改变已经建立连接的worker,等待worker将所有请求结束之后,将原先在旧的配置下启动的worker杀死,然后使用新的配置创建新的worker。

配置

nginx 配置文件主要分成四部分:

main(全局设置): 设置的指令影响其他所有部分的设置
server(主机设置):主要用于制定虚拟主机域名 IP 和端口号
upstream(上游服务器设置):设置一系列的后端服务器,设置反向代理及后端服务器的负载均衡
location(URL匹配特定位置后的设置):用于匹配网页位置(比如,根目录“/”,“/images”,等等)。

他们之间的关系:server 继承 main,location 继承 server;upstream 既不会继承指令也不会被继承。

配置文件的语法规则:

1
2
3
4
5
6
7
1.配置文件由指令与指令块构成;
2.每条指令以 ; 分号结尾,指令与参数间以空格符号分隔;
3.指令块以 {} 大括号将多条指令组织在一起;
4.include 语句允许组合多个配置文件以提升可维护性;
5.使用 # 符号添加注释,提高可读性;
6.使用 $ 符号使用变量;
7.部分指令的参数支持正则表达式;

Nginx 的配置:

1
2
3
4
5
6
7
8
9
10
11
12
13
14
15
16
17
18
19
20
21
22
23
24
25
26
27
28
29
30
31
32
33
34
35
36
37
38
39
40
41
42
43
44
45
46
47
48
49
50
51
52
53
54
55
56
57
58
59
60
61
62
63
64
65
66
67
68
69
70
71
72
73
74
75
76
77
78
79
80
81
82
83
84
85
86
87
88
89
90
91
92
#定义Nginx运行的用户和用户组
user nginx;

#nginx进程数,通常设置成和cpu的数量相等,也可以设置为auto
worker_processes 1;

#全局错误日志定义类型,[debug | info | notice | warn | error | crit]
error_log /var/log/nginx/error.log;
#error_log /var/log/nginx/error.log notice;
#error_log /var/log/nginx/error.log info;

#进程pid文件
pid /run/nginx.pid;

#指定进程可以打开的最大描述符:数目
#工作模式与连接数上限
##这个指令是指当一个nginx进程打开的最多文件描述符数目,理论值应该是最多打开文件数(ulimit -n)与nginx进程数相除,但是nginx分配请求并不是那么均匀,所以最好与ulimit -n 的值保持一致。
#这是因为nginx调度时分配请求到进程并不是那么的均衡,所以假如填写10240,总并发量达到3-4万时就有进程可能超过10240了,这时会返回502错误。
worker_rlimit_nofile 65535;

include /etc/nginx/conf.modules.d/*.conf;

events {
#单个进程最大连接数(最大连接数=连接数+进程数) 默认为1024
#根据硬件调整,和前面工作进程配合起来用,尽量大,但是别把cup跑到100%就行。
worker_connections 1024;
#当连接数过大时可设置为worker_connections 51200;
}

#设定http服务器
http {

# 文件扩展名与类型映射表
include /etc/nginx/mime.types;

# 默认文件类型
default_type application/octet-stream;

#nginx的日志格式
log_format main '$remote_addr - $remote_user [$time_local] "$request" '
'$status $body_bytes_sent "$http_referer" '
'"$http_user_agent" "$http_x_forwarded_for"';
# Nginx访问日志存放位置
access_log /var/log/nginx/access.log main;

#允许客户端请求的最大单文件字节数。如果有上传较大文件,请设置它的限制值
client_max_body_size             100m;

#缓冲区代理缓冲用户端请求的最大字节数
client_body_buffer_size        10m;

#客户端向服务端发送一个完整的 request header 的超时时间
client_header_timeout     3m;

#客户端与服务端建立连接后发送 request body 的超时时间
client_body_timeout 3m;

#服务端向客户端传输数据的超时时间
send_timeout             3m;

#开启高效文件传输模式,sendfile指令指定nginx是否调用sendfile函数来输出文件,对于普通应用设为 on,如果用来进行下载等应用磁盘IO重负载应用,可设置为off,以平衡磁盘与网络I/O处理速 度,降低系统的负载。注意:如果图片显示不正常把这个改 成off。
sendfile on;

#防止网络阻塞
#tcp_nopush on;

#长连接超时时间,单位是秒
keepalive_timeout 65;

#开启gzip压缩
#gzip on;

# 加载子配置项
include /etc/nginx/conf.d/*.conf;

index index.html index.htm;

server {
listen 80; #监听端口,默认80,小于1024的要以root启动
server_name localhost; #服务器名,如localhost、http://www.example.com,可以通过正则匹配。

location / {
root /usr/share/nginx/html; # 网站根目录
index index.html index.htm; # 默认首页文件
deny 172.168.22.11; # 禁止访问的ip地址,可以为all
allow 172.168.33.44# 允许访问的ip地址,可以为all
}

error_page 500 502 503 504 /50x.html; # 默认50x对应的访问页面
error_page 400 404 error.html; # 同上
}
}

server 块可以包含多个 location 块,location 指令用于匹配 uri,语法:

1
2
3
location [ = | ~ | ~* | ^~] uri {
...
}

指令后面:

1.=精确匹配路径,用于不含正则表达式的 uri 前,如果匹配成功,不再进行后续的查找;
2.^用于不含正则表达式的 uri; 前,表示如果该符号后面的字符是最佳匹配,采用该规则,不再进行后续的查找;
3. 表示用该符号后面的正则去匹配路径,区分大小写;
4.~*表示用该符号后面的正则去匹配路径,不区分大小写。跟 ~ 优先级都比较低,如有多个location的正则能匹配的话,则使用正则表达式最长的那个;

如果 uri 包含正则表达式,则必须要有 ~ 或 ~* 标志。

常用的全局变量

全局变量名 功能
$host 请求信息中的 Host,如果请求中没有 Host 行,则等于设置的服务器名,不包含端口
$request_method 客户端请求类型,如 GET、POST
$remote_addr 客户端的 IP 地址
$args 请求中的参数
$arg_PARAMETER GET 请求中变量名 PARAMETER 参数的值,例如:$http_user_agent(Uaer-Agent 值), $http_referer…
$content_length 请求头中的 Content-length 字段
$http_user_agent 客户端agent信息
$http_cookie 客户端cookie信息
$remote_addr 客户端的IP地址
$remote_port 客户端的端口
$http_user_agent 客户端agent信息
$server_protocol 请求使用的协议,如 HTTP/1.0、HTTP/1.1
$server_addr 服务器地址
$server_name 服务器名称
$server_port 服务器的端口号
$scheme HTTP 方法(如http,https)

配置正向代理

代理服务器:

1
2
3
4
5
6
7
8
9
10
11
12
13
14
server {
resolver 8.8.8.8; # 必需
resolver_timeout 5s;

# 监听端口
listen 8088;

location / {
# 配置正向代理参数
proxy_pass $scheme://$host$request_uri;
# 解决如果URL中带"."后Nginx 503错误
proxy_set_header Host $http_host;
}
}

linux客户端

1
2
3
4
5
6
7
一次代理,直接在shell执行:
export http_proxy=http://192.168.10.117:8088

永久使用:
vim .bashrc
export http_proxy=http://192.168.10.117:8088
source  .bashrc

配置代理后,查看出口是否变为白名单ip

1
2
3
export http_proxy=http://192.168.10.117:8088
curl http://myip.ipip.net/
当前 IP:119.130.113.243 来自于:中国 广东 广州 电信

配置反向代理

1
2
3
4
5
6
7
8
  server {
linsten 80;
server_name localhost;

location / {
proxy_pass http://myserver;
}
}

可以将请求转发到另一个服务器上,也可以根据访问的路径跳转到不同端口的服务中。
比如我们监听 9001 端口,然后把访问不同路径的请求进行反向代理:

1
2
3
4
5
6
7
8
9
10
11
12
13
14
15
16
17
18
19
20
21
22
23
24
25
26
27
28
29
30
31
32
33
34
35
36
37
38
39
#把访问 http://127.0.0.1:9001/a 的请求转发到 http://127.0.0.1:8080
#把访问 http://127.0.0.1:9001/b 的请求转发到 http://127.0.0.1:8081

在 http 模块下增加一个 server 块:
server {
listen 9001;
server_name localhost;

location /a/ {
proxy_pass http://127.0.0.1:8080;
}

location /b/ {
proxy_pass http://127.0.0.1:8081;
#proxy_set_header 客户端请求发送给后端服务器之前,更改来自客户端的请求头信息

#把原请求的Header中的Host字段也放到转发里,如果不加后端获取的请求为nginx的IP
proxy_set_header   Host    $host;

#获得用户的真实ip
proxy_set_header   X-Real-IP   $remote_addr;
proxy_set_header   X-Forwarded-For $proxy_add_x_forwarded_for;

#识别协议HTTP或HTTPS
proxy_set_header   X-Forwarded-Proto $scheme;

#配置Nginx与后端代理服务器尝试建立连接的超时时间
proxy_connect_timeout 300;

#连接成功后_等候后端服务器响应时间
proxy_send_timeout 300;

#后端服务器数据回传时间
proxy_read_timeout 300;

#修改后端服务器返回的响应头中的Location和Refresh
proxy_redirect off;
}
}

配置负载均衡

Nginx 提供了好几种分配方式,默认为轮询,就是轮流来。有以下几种分配方式:

1.轮询,默认方式,每个请求按时间顺序逐一分配到不同的后端服务器,如果后端服务挂了,能自动剔除;

1
2
3
4
5
6
7
http {
upstream myserver {
server 127.0.0.1:8081; # 负载均衡目的服务地址
server 127.0.0.1:8080;
server 127.0.0.1:8082p;
}
}

2.weight,权重分配,指定轮询几率,权重越高,在被访问的概率越大,用于后端服务器性能不均的情况;

1
2
3
4
5
6
7
http {
upstream myserver {
server 127.0.0.1:8081 weight=1; # 负载均衡目的服务地址
server 127.0.0.1:8080 weight=1;
server 127.0.0.1:8082 weight=10; # weight 方式,不写默认为 1
}
}

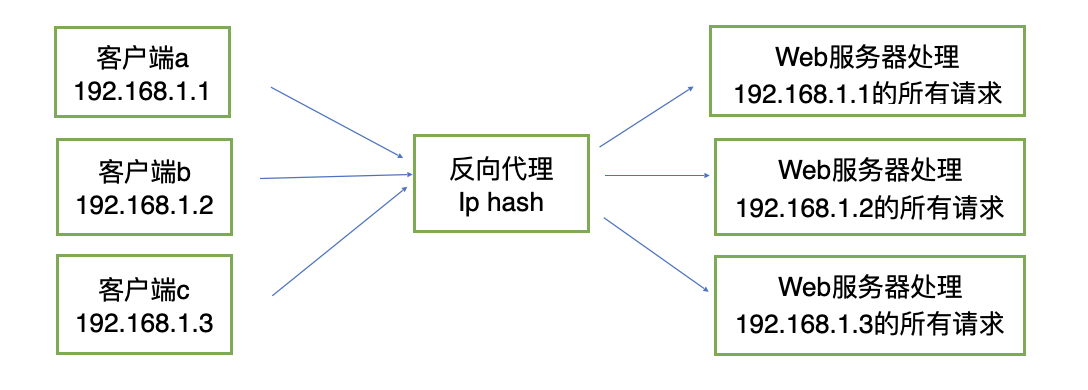
3.ip_hash,对客户端请求的ip进行hash操作,然后根据hash结果将同一个客户端ip的请求分发给同一台服务器进行处理,可以解决session不共享的问题。

1
2
3
4
5
6
7
8
http {
upstream myserver {
server 127.0.0.1:8081; # 负载均衡目的服务地址
server 127.0.0.1:8080;
server 127.0.0.1:8082;
ip_hash;
}
}

iphash

4.fair(第三方),按后端服务器的响应时间分配,响应时间短的优先分配,依赖第三方插件 nginx-upstream-fair,需要先安装;

1
2
3
4
5
6
7
8
http {
upstream myserver {
server 127.0.0.1:8081; # 负载均衡目的服务地址
server 127.0.0.1:8080;
server 127.0.0.1:8082;
fair;
}
}

5.backup,携带backup代表此server为备用,nginx只有在转发到主server出现问题,才会切换到backup的server

1
2
3
4
5
6
7
http {
upstream myserver {
server 127.0.0.1:8081; # 负载均衡目的服务地址
server 127.0.0.1:8080;
server 127.0.0.1:8082 backup;
}
}

开启gzip

gzip 是一种常用的网页压缩技术,传输的网页经过 gzip 压缩之后大小通常可以变为原来的一半甚至更小(官网原话),更小的网页体积也就意味着带宽的节约和传输速度的提升,特别是对于访问量巨大大型网站来说,每一个静态资源体积的减小,都会带来可观的流量与带宽的节省。

使用 gzip 不仅需要 Nginx 配置,浏览器端也需要配合,需要在请求消息头中包含 Accept-Encoding: gzip(IE5 之后所有的浏览器都支持了,是现代浏览器的默认设置)。一般在请求 html 和 css 等静态资源的时候,支持的浏览器在 request 请求静态资源的时候,会加上 Accept-Encoding: gzip 这个 header,表示自己支持 gzip 的压缩方式,Nginx 在拿到这个请求的时候,如果有相应配置,就会返回经过 gzip 压缩过的文件给浏览器,并在 response 相应的时候加上 content-encoding: gzip 来告诉浏览器自己采用的压缩方式(因为浏览器在传给服务器的时候一般还告诉服务器自己支持好几种压缩方式),浏览器拿到压缩的文件后,根据自己的解压方式进行解析。

1
2
3
4
5
6
7
8
9
10
11
12
13
14
15
16
17
18
19
20
21
22
23
24
25
gzip on;

#进行压缩的文件类型。javascript有多种形式。其中的值可以在 mime.types 文件中找到。
gzip_types text/plain text/css application/json application/x-javascript text/xml application/xml application/xml+rss text/javascript;

#默认 off,该模块启用后,Nginx 首先检查是否存在请求静态文件的 gz 结尾的文件,如果有则直接返回该 .gz 文件内容;
gzip_static on;

#默认 off,nginx做为反向代理时启用,用于设置启用或禁用从代理服务器上收到相应内容 gzip 压缩;
gzip_proxied any;

#用于在响应消息头中添加 Vary:Accept-Encoding,使代理服务器根据请求头中的 Accept-Encoding 识别是否启用 gzip 压缩
gzip_vary on;

#gzip 压缩比,压缩级别是 1-9,1 压缩级别最低,9 最高,数字越大压缩的越好,也越占用CPU时间。一般设置1和2;
gzip_comp_level 2;

#获取多少内存用于缓存压缩结果,4 8k 表示以 8k*4 为单位获得;
gzip_buffers 4 8k;

#启用gzip压缩的最小文件,小于设置值的文件将不会压缩
gzip_min_length 1k;

#默认 1.1,启用 gzip 所需的 HTTP 最低版本;这个配置可以插入到 http 模块整个服务器的配置里,也可以插入到需要使用的虚拟主机的 server 或者下面的 location 模块中
gzip_http_version 1.1;

配置 HTTPS

1
2
3
4
5
6
7
8
9
10
11
12
13
14
15
16
17
18
19
server {
listen 443 ssl http2 default_server; # SSL 访问端口号为 443
server_name www.nmk0718.com; # 填写绑定证书的域名
add_header backendIP $upstream_addr; #把后端具体的 upstream 返回给前端 header
add_header backendCode $upstream_status;

ssl_certificate /etc/nginx/https/nm0718.crt; # 证书文件地址
ssl_certificate_key /etc/nginx/https/nm0718.key; # 私钥文件地址
ssl_session_timeout 10m;

ssl_protocols TLSv1 TLSv1.1 TLSv1.2; #请按照以下协议配置
ssl_ciphers ECDHE-RSA-AES128-GCM-SHA256:HIGH:!aNULL:!MD5:!RC4:!DHE;
ssl_prefer_server_ciphers on;

location / {
root /usr/share/nginx/html;
index index.html index.htm;
}
}

跨域 CORS 配置

使用反向代理解决跨域

在前端服务地址为 prod.nmk0718.com 的页面请求 api.nmk0718.com 的后端服务导致的跨域,可以这样配置:

1
2
3
4
5
6
7
8
9
10
11
12
13
14
server {

listen 80;

server_name prod.nmk0718.com;


location / {

proxy_pass api.nmk0718.com;

}

}

这样前端调用prod.nmk0718.com的接口会被转发后api.nmk0718.com,前后端都是prod.nmk0718.com的情况下就不存在跨域了

配置 header 解决跨域

在请求的接口location中加入以下配置进行解决跨域

1
2
3
4
5
6
7
8
9
10
11
12
13
14
15
16
17
18
19
20
21
22
23
24
25
26

server {

listen 80;

server_name api.nmk0718.com;


location / {

proxy_pass http://localhost:8081;

#接受所有跨域的请求
add_header Access-Control-Allow-Origin *;

#允许的请求方法
add_header Access-Control-Allow-Methods 'GET, POST, OPTIONS';

#允许请求的header
add_header Access-Control-Allow-Headers 'DNT,X-Mx-ReqToken,Keep-Alive,User-Agent,X-Requested-With,If-Modified-Since,Cache-Control,Content-Type,Authorization';

if ($request_method = 'OPTIONS') {
return 204;
}
}
}

http请求转发到https

配置完 HTTPS 后,浏览器还是可以访问 HTTP 的地址的,可以做一个 301 跳转,把对应域名的 HTTP 请求重定向到 HTTPS 上

1
2
3
4
5
6
7
8
9
10
11
12
13
14
15
16
17
18
19
server {
listen 80;
servername www.nmk0718.com;

#单域名重定向
if ($host = 'www.sherlocked93.club';){
return 301 https://www.sherlocked93.club$request_uri;
}

#全局非 https 协议时重定向
if ($scheme != 'https';){
return 301 https://$server_name$request_uri;
}

#或者全部重定向
return 301 https://$server_name$request_uri;

#以上配置选择自己需要的即可,不用全部加
}

转发websocket

1
2
3
4
5
6
7
8
9
10
http {
map $http_upgrade $connection_upgrade { default upgrade; '' close;}
server {
location / {
#…
proxy_set_header Upgrade $http_upgrade;
proxy_set_header Connection $connection_upgrade;
}
}
}

静态文件转发

1
2
3
4
5
6
7
8
9
10
11
12
13
14
15
16
17
#请求/web时访问的文件为/home/test/index.html
location /web {
alias /home/test/;
index index.html;
}
#请求/web/时访问的文件为/home/web/index.html
location /web/ {
root /home/;
index index.html;
}

##Vue路由模式需要加入try_files
location /app {
alias /home/test/app/;
try_files $uri $uri/ /index.html last;
index index.html;
}

静态文件缓存
由于图片、字体、音频、视频等静态文件在打包的时候通常会增加了 hash,所以缓存可以设置的长一点,先设置强制缓存,再设置协商缓存;如果存在没有 hash 值的静态文件,建议不设置强制缓存,仅通过协商缓存判断是否需要使用缓存

1
2
3
4
5
6
7
location ~ .*\.(css|js|jpg|png|gif|swf|woff|woff2|eot|svg|ttf|otf|mp3|m4a|aac|txt)$ {
expires 10d;
}


# 如果不希望缓存
expires -1;

重定向

1
2
3
4
5
6
7
8
9
10
11
12
13
14
15
16
17
18
19
20
21
22
23
24
25
26
27
28
29
#转发 域名/api/后的任意字符 到 https://www.nmk0718.com/api/后面
rewrite ^/api/(.*) https://www.nmk0718.com/api/$1 permanent;
例如访问 test.nmk0718/api/abc 转发到 https://www.nmk0718.com/api/abc

#转发 域名/nmk0718/index后的任意字符 到error.jpg
rewrite ^/nmk0718/index(.*) http://nmk0718.com/error.jpg;

#转发 域名/nmk0718/index后字符跟systemId和&shops匹配的链接 到error.jpg(因nginx不支持and故使用set参数的方式进行转发)
location ^~/nmk0718/index {

set $foo "";
if ($args ~* "systemId=202006117621654047") {
set $foo "${foo}1";
}
if ($args ~* "&shops=102") {
set $foo "${foo}1";
}
if ($foo ~* "11") {
rewrite /nmk0718/index http://nmk0718.com/error.jpg;
}
root html;
#定义首页索引文件的名称
index index.html index.htm index.jsp;
#定义后端负载服务器组
proxy_pass http://nmk/nmk0718/index;
proxy_set_header Host $host;
proxy_set_header X-Real-IP $remote_addr;
proxy_set_header X-Forwarded-For $proxy_add_x_forwarded_for;
}

操作命令

使用nginx -h 查看完整的nginx命令

1
2
3
4
5
6
7
8
9
10
11
12
13
14
15
16
17
18
19
20
21
22
23
24
25
26
27
28
29
30
31
32
33
34
35
36
37
38
39
40
41
42
43
44
45
46
47
48
49
50
51
52
[root@deployment nginx]# ./sbin/nginx -h
nginx version: nginx/1.16.0
Usage: nginx [-?hvVtTq] [-s signal] [-c filename] [-p prefix] [-g directives]

Options:
-?,-h : this help
-v : show version and exit
-V : show version and configure options then exit
-t : test configuration and exit
-T : test configuration, dump it and exit
-q : suppress non-error messages during configuration testing
-s signal : send signal to a master process: stop, quit, reopen, reload
-p prefix : set prefix path (default: /usr/local/nginx/)
-c filename : set configuration file (default: conf/nginx.conf)
-g directives : set global directives out of configuration file

#nginx命令参数
-c </path/to/config> 为 Nginx 指定一个配置文件,来代替缺省的。
-t 如需检查配置文件的语法的正确性
-v 显示 nginx 的版本
-V 显示 nginx 的版本,编译器版本和配置参数(可查看nginx使用的模块)。
-s reload # 向主进程发送信号,重新加载配置文件
-s reopen # 重启 Nginx
-s stop # 快速关闭
-s quit # 等待工作进程处理完成后关闭


#---windows下nginx命令---

#查看nginx进程
tasklist /fi "imagename eq nginx.exe"

#强制结束所有nginx进程
taskkill /F /IM nginx.exe

#---linux下nginx命令---

#使用yum安装的目录
/etc/nginx
#自己编译或包安装的目录
/usr/local/nginx
#如果两种都没找到nginx使用以下命令可查看到目录
#centos7之前
service nginx status
#centos7之后
systemctl status nginx

#查看nginx进程
ps -ef|grep nginx

#强制结束所有nginx进程
killalll nginx

proxy_pass中url末尾带/与不带/的区别

proxy_pass配置中url末尾带/时,nginx转发时,会将原uri去除location匹配表达式后的内容拼接在proxy_pass中url之后。

1
2
3
4
5
6
7
8
9
10
11
12
13
14
15
16
17
18
19
20
21
22
23
24
25
26
27
28
29
30
31
32
33
34
35
36
37
38
测试地址:http://192.168.171.129/test/tes.jsp


场景一:

location ^~ /test/ {

proxy_pass http://192.168.171.129:8080/server/;

}
代理后实际访问地址: http://192.168.171.129:8080/server/tes.jsp

场景二:

location ^~ /test {

proxy_pass http://192.168.171.129:8080/server/;

}
代理后实际访问地址: http://192.168.171.129:8080/server//tes.jsp

场景三:

location ^~ /test/ {

proxy_pass http://192.168.171.129:8080/;

}
代理后实际访问地址: http://192.168.171.129:8080/tes.jsp

场景四:

location ^~ /test {

proxy_pass http://192.168.171.129:8080/;

}
代理后实际访问地址: http://192.168.171.129:8080//tes.jsp

proxy_pass配置中url末尾不带/时,如url中不包含path,则直接将原uri拼接在proxy_pass中url之后;如url中包含path,则将原uri去除location匹配表达式后的内容拼接在proxy_pass中的url之后。

1
2
3
4
5
6
7
8
9
10
11
12
13
14
15
16
17
18
19
20
21
22
23
24
25
26
27
28
29
30
31
32
33
34
35
36
37
38
测试地址:http://192.168.171.129/test/tes.jsp


场景一:

location ^~ /test/ {

proxy_pass http://192.168.171.129:8080/server;

}
代理后实际访问地址: http://192.168.171.129:8080/servertes.jsp

场景二:

location ^~ /test {

proxy_pass http://192.168.171.129:8080/server;

}
代理后实际访问地址: http://192.168.171.129:8080/server/tes.jsp

场景三:

location ^~ /test/ {

proxy_pass http://192.168.171.129:8080;

}
代理后实际访问地址: http://192.168.171.129:8080/test/tes.jsp

场景四:

location ^~ /test {

proxy_pass http://192.168.171.129:8080;

}
代理后实际访问地址: http://192.168.171.129:8080/test/tes.jsp

适配 PC 或移动设备

根据用户设备不同返回不同样式的站点,以前经常使用的是纯前端的自适应布局,但无论是复杂性和易用性上面还是不如分开编写的好,比如我们常见的淘宝、京东……这些大型网站就都没有采用自适应,而是用分开制作的方式,根据用户请求的 user-agent 来判断是返回 PC 还是 H5 站点。
使用$http_user_agent 全局变量来判断用户请求的 user-agent,指向不同的 root 路径,返回对应站点。

1
2
3
4
5
6
7
8
9
10
11
12
13
14
15
16
17
18
19
20
21
server {

listen 80;

server_name www.nmk0718.com;

location / {

root /usr/share/nginx/html/pc;

if ($http_user_agent ~* '(Android|webOS|iPhone|iPod|BlackBerry)') {

root /usr/share/nginx/html/mobile;

}

index index.html;

}

}

泛域名转发

和之前的功能类似,有时候我们希望把二级或者三级域名链接重写到我们希望的路径,让后端就可以根据路由解析不同的规则:

1
2
3
4
5
6
7
8
9
10
11
12
13
14
15
test1.nmk0718.com/api?name=a 自动转发到 127.0.0.1:8080/test1/api?name=a;
test2.nmk0718.com/api?name=a 自动转发到 127.0.0.1:8080/test2/api?name=a ;

server {
listen 80;
server_name ~^([\w-]+)\.nmk0718\.com$;

location / {
proxy_set_header X-Real-IP $remote_addr;
proxy_set_header X-Forwarded-For $proxy_add_x_forwarded_for;
proxy_set_header Host $http_host;
proxy_set_header X-NginX-Proxy true;
proxy_pass http://127.0.0.1:8080/$1$request_uri;
}
}

泛域名路径分离

这是一个非常实用的技能,经常有时候我们可能需要配置一些二级或者三级域名,希望通过 Nginx 自动指向对应目录,比如:

1
2
3
4
5
6
7
8
9
test1.nmk0718.com 自动指向 /usr/share/nginx/html/test1 服务器地址;
test2.nmk0718.com 自动指向 /usr/share/nginx/html/test2 服务器地址;

server {
listen 80;
server_name ~^([\w-]+)\.nmk0718\.com$;

root /usr/share/nginx/html/$1;
}

1.为了使 Nginx 配置更易于维护,建议为每个服务创建一个单独的配置文件,存储在 /etc/nginx/conf/website 目录,根据需求可以创建任意多个独立的配置文件。
2.独立的配置文件,建议遵循以下命名约定 <服务>.conf,比如域名是www. nmk0718.com”,那么你的配置文件的应该是这样的./etc/nginx/conf/website/www. nmk0718.com.conf,如果部署多个服务,也可以在文件名中加上 Nginx 转发的端口号。
3.Nginx 日志相关目录,内以 域名.type.log 命名(比如www. nmk0718.com.access.log 和 www. nmk0718.com.error.log )位于 /var/log/nginx/ 目录中,为每个独立的服务配置不同的访问权限和错误日志文件,这样查找错误时,会更加方便快捷。
日志相关目录,内以 域名.type.log 命名(比如 www. nmk0718.com.access.log 和 www. nmk0718.com.error.log )位于 /var/log/nginx/ 目录中,为每个独立的服务配置不同的访问权限和错误日志文件,这样查找错误时,会更加方便快捷。

转发物理机:容器流量10:1

转发思路:user>master-nginx>upstream>slave-nginx或ingress

最后效果:用户访问域名,域名进入nginx的upstream 10次有1次进入ingress转发给容器,另外就此转发给slave-nginx,再转给物理机

master-nginx

1
2
3
4
5
6
7
8
9
10
11
12
13
14
15
16
17
18
19
20
21
22
23
24
25
26
27
28
29
30
31
32
33
34
35
36
37
38
39
40
41
42
43
44
45
46
47
#物理机双节点
upstream nmk{
server 172.17.53.153:19151;
server 172.17.53.154:19151;
}
改为
#148为slave-nginx的ip,172为ingress的ip
upstream nmkhttp {
server 172.17.53.148:80 weight=10 fail_timeout=10;
server 172.17.53.172:80 weight=1 fail_timeout=10;
}
upstream nmkhttps {
server 172.17.53.148:443 weight=10 fail_timeout=10;
server 172.17.53.172:443 weight=1 fail_timeout=10;
}

server {
listen 80 default;
server_name www.nmk0718.com

location /nmk {
root html;
#定义首页索引文件的名称
index index.html index.htm index.jsp;
#定义后端负载服务器组
proxy_pass http://nmkhttp;
proxy_set_header Host $host:$server_port;
proxy_set_header X-Real-IP $remote_addr;
proxy_set_header X-Forwarded-For $proxy_add_x_forwarded_for;
}
}
server {
listen 443 ssl;
listen 8443 ssl;
server_name www.nmk0718.com

location /nmk {
root html;
#定义首页索引文件的名称
index index.html index.htm index.jsp;
#定义后端负载服务器组
proxy_pass https://nmkhttps;
proxy_set_header Host $host:$server_port;
proxy_set_header X-Real-IP $remote_addr;
proxy_set_header X-Forwarded-For $proxy_add_x_forwarded_for;
}
}

slave-nginx

1
2
3
4
5
6
7
8
9
10
11
12
13
14
15
16
17
18
19
upstream nmk{
server 172.17.53.153:19151;
server 172.17.53.154:19151;
}
server {
listen 80 default;
server_name www.nmk0718.com

location /nmk {
root html;
#定义首页索引文件的名称
index index.html index.htm index.jsp;
#定义后端负载服务器组
proxy_pass http://nmk;
proxy_set_header Host $host:$server_port;
proxy_set_header X-Real-IP $remote_addr;
proxy_set_header X-Forwarded-For $proxy_add_x_forwarded_for;
}
}

后端健康检查

nginx自带健康检查的缺陷:

  1. Nginx只有当有访问时后,才发起对后端节点探测。
  2. 如果本次请求中,节点正好出现故障,Nginx依然将请求转交给故障的节点,然后再转交给健康的节点处理。所以不会影响到这次请求的正常进行。但是会影响效率,因为多了一次转发
  3. 自带模块无法做到预警
  4. 被动健康检查

使用第三访模块nginx_upstream_check_module:

  1. 区别于nginx自带的非主动式的心跳检测,淘宝开发的tengine自带了一个提供主动式后端服务器心跳检测模块
  2. 若健康检查包类型为http,在开启健康检查功能后,nginx会根据设置的间隔向指定的后端服务器端口发送健康检查包,并根据期望的HTTP回复状态码来判断服务是否健康。
  3. 后端真实节点不可用,则请求不会转发到故障节点
  4. 故障节点恢复后,请求正常转发

主动地健康检查,nignx定时主动地去ping后端的服务列表,当发现某服务出现异常时,把该服务从健康列表中移除,当发现某服务恢复时,又能够将该服务加回健康列表中。淘宝有一个开源的实现nginx_upstream_check_module模块

1
2
github地址:https://github.com/yaoweibin/nginx_upstream_check_module
taobao官网:http://tengine.taobao.org/document_cn/http_upstream_check_cn.html

安装nginx_upstream_check_module

安装扩展模块,需要编译安装的nginx,版本自己选择

1
2
3
4
5
6
7
8
9
10
11
12
13
14
15
16
17
18
19
20
21
#获取安装包
wget https://codeload.github.com/yaoweibin/nginx_upstream_check_module/zip/master

#给nginx打补丁
unzip master

#进入nginx-1.16.1,进行打该模块的补丁
yum install patch-2.7.1-12.el7_7.x86_64 -y
patch -p1 < ../nginx_upstream_check_module-master/check_1.16.1+.patch

#编译安装
./configure --prefix=/usr/local/nginx --add-module=/usr/local/nginx_upstream_check_module-master/

make && make install

make upgrade

[root@service nginx]# ./sbin/nginx -V
nginx version: nginx/1.16.1
built by gcc 4.8.5 20150623 (Red Hat 4.8.5-44) (GCC)
configure arguments: --prefix=/usr/local/nginx --add-module=/usr/local/nginx_upstream_check_module-master/

服务治理的一个重要任务是感知服务节点变更,完成服务自动注册及异常节点的自动摘除。这就需要服务治理平台能够:及时准确的感知service节点的健康状况。

Nginx 提供了三种HTTP服务健康检查方案供用户选择:

  1. TCP层默认检查方案:
    定时与后端服务建立一条tcp连接,链接建立成功则认为服务节点是健康的。
  2. HTTP层默认检查方案:
    TCP层检查有一定的局限性:
    1. 很多HTTP服务是带状态的,端口处于listen状态并不能代表服务已经完成预热;
    2. 不能真实反映服务内部处理逻辑是否产生拥堵。
    3. 这时可以选择http层健康检查,会向服务发送一个http请求GET / HTTP/1.0\r\n\r\n,返回状态是2xx或3xx时认为后端服务正常。
  3. 自定义方案:(nginx_upstream_check_module模块)
    可根据下文描述自定义检查方案。

指令

Syntax: check interval=milliseconds [fall=count] [rise=count] [timeout=milliseconds] [default_down=true|false] [type=tcp|http|ssl_hello|mysql|ajp] [port=check_port]
Default: 如果没有配置参数,默认值是:interval=30000 fall=5 rise=2 timeout=1000 default_down=true type=tcp
Context: upstream

指令后面的参数意义是:

  • interval:向后端发送的健康检查包的间隔。
  • fall(fall_count): 如果连续失败次数达到fall_count,服务器就被认为是down。
  • rise(rise_count): 如果连续成功次数达到rise_count,服务器就被认为是up。
  • timeout: 后端健康请求的超时时间。
  • default_down: 设定初始时服务器的状态,如果是true,就说明默认是down的,如果是false,就是up的。默认值是true,也就是一开始服务器认为是不可用,要等健康检查包达到一定成功次数以后才会被认为是健康的。
  • type:健康检查包的类型,现在支持以下多种类型
    • tcp:简单的tcp连接,如果连接成功,就说明后端正常。
    • ssl_hello:发送一个初始的SSL hello包并接受服务器的SSL hello包。
    • http:发送HTTP请求,通过后端的回复包的状态来判断后端是否存活。
    • mysql: 向mysql服务器连接,通过接收服务器的greeting包来判断后端是否存活。
    • ajp:向后端发送AJP协议的Cping包,通过接收Cpong包来判断后端是否存活。
  • port: 指定后端服务器的检查端口。你可以指定不同于真实服务的后端服务器的端口,比如后端提供的是443端口的应用,你可以去检查80端口的状态来判断后端健康状况。默认是0,表示跟后端server提供真实服务的端口一样。该选项出现于Tengine-1.4.0。

Syntax: check_http_expect_alive [ http_2xx | http_3xx | http_4xx | http_5xx ]
Default: http_2xx | http_3xx
Context: upstream

该指令指定HTTP回复的成功状态,默认认为2XX和3XX的状态是健康的。

Syntax: check_http_send http_packet
Default: "GET / HTTP/1.0\r\n\r\n"
Context: upstream

该指令可以配置http健康检查包发送的请求内容。为了减少传输数据量,推荐采用"HEAD"方法。

当采用长连接进行健康检查时,需在该指令中添加keep-alive请求头,如:"HEAD / HTTP/1.1\r\nConnection: keep-alive\r\n\r\n"
同时,在采用"GET"方法的情况下,请求uri的size不宜过大,确保可以在1个interval内传输完成,否则会被健康检查模块视为后端服务器或网络异常。

完整参数配置:
http://tengine.taobao.org/document_cn/http_upstream_check_cn.html

官方示例:

1
2
3
4
5
6
7
8
9
10
11
12
13
14
15
16
17
18
19
20
21
22
23
24
25
26
27
28
29
30
31
32
33
34
35
36
37
38
39
40
41
42
http {
upstream cluster1 {
# simple round-robin
server 192.168.0.1:80;
server 192.168.0.2:80;

check interval=3000 rise=2 fall=5 timeout=1000 type=http;
check_http_send "HEAD / HTTP/1.0\r\n\r\n";
check_http_expect_alive http_2xx http_3xx;
}

upstream cluster2 {
# simple round-robin
server 192.168.0.3:80;
server 192.168.0.4:80;

check interval=3000 rise=2 fall=5 timeout=1000 type=http;
check_keepalive_requests 100;
check_http_send "HEAD / HTTP/1.1\r\nConnection: keep-alive\r\n\r\n";
check_http_expect_alive http_2xx http_3xx;
}

server {
listen 80;

location /1 {
proxy_pass http://cluster1;
}

location /2 {
proxy_pass http://cluster2;
}

location /status {
check_status;

access_log off;
allow SOME.IP.ADD.RESS;
deny all;
}
}
}

使用demo:

1
2
3
4
5
6
7
8
9
10
11
12
13
14
15
16
17
18
19
20
21
22
23
24
25
26
upstream apiservice{
server 192.168.50.55:8087;

#对http主动检测,2XX,3XX为up,4XX,5xx为down
check interval=3000 rise=2 fall=5 timeout=1000 type=http;
check_http_send "HEAD /health/check HTTP/1.0\r\n\r\n";
check_http_expect_alive http_2xx http_3xx;
}
server {
listen 80;
server_name localhost;

#charset koi8-r;

#access_log logs/host.access.log main;

location /check-status {
check_status;
}
location /doctor-api/ {
proxy_pass http://apiservice;
proxy_set_header Host $host;
proxy_set_header X-Real-IP $remote_addr;
proxy_set_header X-Forwarded-For $proxy_add_x_forwarded_for;
proxy_set_header X-Forwarded-Proto $scheme;
}

访问健康检测的页面
check_up
可看到服务为up,把服务下线后再次查看
check_down
服务为down,此时后端服务已下线

1
2
3
4
5
6
7
8
9
server number是后端服务器的数量
Index是服务器的索引
Upstream是在配置中upstream的名称
Name是服务器IP
Status是服务器的状态
Rise counts是服务器连续检查成功的次数
Fall counts是连续检查失败的次数
Check type是检查的方式
Check port是后端专门为健康检查设置的端口

四层负载均衡

七层负载均衡:只识别域名,是http层。

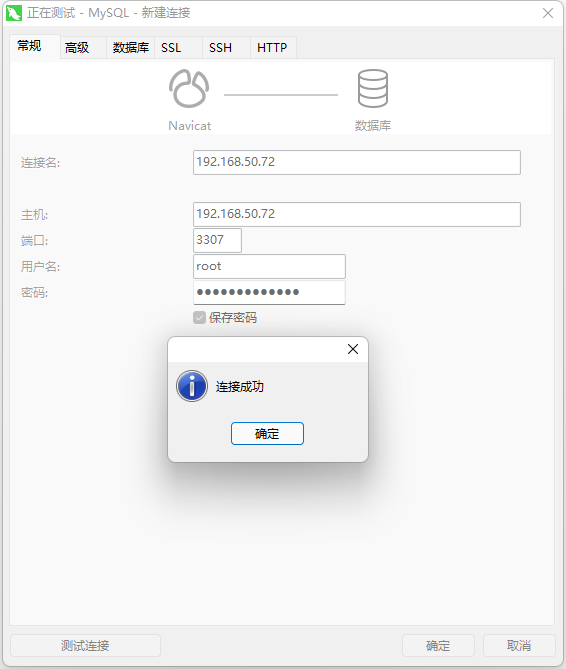
四层负载均衡:不识别域名,是tcp层,类似于端口转发。

可用于ftp,sftp,database等端口的转发

查看当前模块

1
2
3
4
[root@service nginx]# ./sbin/nginx -V
nginx version: nginx/1.16.1
built by gcc 4.8.5 20150623 (Red Hat 4.8.5-44) (GCC)
configure arguments: --prefix=/usr/local/nginx --add-module=/usr/local/nginx_upstream_check_module-master/

进入源码目录,重新编译

1
2
3
4
5
6
7
8
9
10
11
12
cd /usr/local/nginx-1.16.1

#在当前模块命令后添加--with-stream
./configure --prefix=/usr/local/nginx --add-module=/usr/local/nginx_upstream_check_module-master/ --with-stream

make & make install

#再次查看添加模块是否成功
[root@service nginx]# ./sbin/nginx -V
nginx version: nginx/1.16.1
built by gcc 4.8.5 20150623 (Red Hat 4.8.5-44) (GCC)
configure arguments: --prefix=/usr/local/nginx --add-module=/usr/local/nginx_upstream_check_module-master/ --with-stream

示例配置:
stream段的配置要与http段在同级

1
2
3
4
5
6
7
8
9
10
11
12
13
14
15
16
17
http {
···
}
stream {

upstream mysql {
server 192.168.50.51:3306 max_fails=2 fail_timeout=120s;
}

server {
listen 3307;
proxy_connect_timeout 10s;
proxy_timeout 300s;#设置客户端和代理服务之间的超时时间,如果5分钟内没操作将自动断开。
proxy_pass mysql;
}

}

测试连接是否正常
teststream

nginx增加kafka模块

模块地址

1
https://github.com/brg-liuwei/ngx_kafka_module/tree/master

下载源码

1
2
3
wget http://nginx.org/download/nginx-1.20.1.tar.gz
tar -zxvf nginx-1.20.1.tar.gz
cd nginx-1.20.1/

配置编译使用的模块

1
./configure  --prefix=/usr/share/nginx --sbin-path=/usr/sbin/nginx --modules-path=/usr/lib64/nginx/modules --conf-path=/etc/nginx/nginx.conf --error-log-path=/var/log/nginx/error.log --http-log-path=/var/log/nginx/access.log --http-client-body-temp-path=/var/lib/nginx/tmp/client_body --http-proxy-temp-path=/var/lib/nginx/tmp/proxy --http-fastcgi-temp-path=/var/lib/nginx/tmp/fastcgi --http-uwsgi-temp-path=/var/lib/nginx/tmp/uwsgi --http-scgi-temp-path=/var/lib/nginx/tmp/scgi --pid-path=/run/nginx.pid --lock-path=/run/lock/subsys/nginx --user=nginx --group=nginx --with-file-aio --with-ipv6 --with-http_auth_request_module --with-http_ssl_module --with-http_v2_module --with-http_realip_module --with-http_addition_module --with-http_xslt_module=dynamic --with-http_image_filter_module=dynamic --with-http_geoip_module=dynamic --with-http_sub_module --with-http_dav_module --with-http_flv_module --with-http_mp4_module --with-http_gunzip_module --with-http_gzip_static_module --with-http_random_index_module --with-http_secure_link_module --with-http_degradation_module --with-http_slice_module --with-http_stub_status_module --with-http_perl_module=dynamic --with-mail=dynamic --with-mail_ssl_module --with-pcre --with-pcre-jit --with-stream=dynamic --with-stream_ssl_module --with-google_perftools_module --with-debug --with-cc-opt='-O2 -g -pipe -Wall -Wp,-D_FORTIFY_SOURCE=2 -fexceptions -fstack-protector-strong --param=ssp-buffer-size=4 -grecord-gcc-switches -specs=/usr/lib/rpm/redhat/redhat-hardened-cc1 -m64 -mtune=generic' --with-ld-opt='-Wl,-z,relro -specs=/usr/lib/rpm/redhat/redhat-hardened-ld -Wl,-E' --with-compat --with-stream_ssl_preread_module --with-threads --add-dynamic-module=/root/ngx_kafka_module

编译

1
make

此处不进行install安装

进入编译的目录

1
2
3
4
cd objs
[root@idt01 objs]# ./nginx -c /etc/nginx/nginx.conf -t
nginx: [emerg] module "/usr/lib64/nginx/modules/ngx_http_image_filter_module.so" is not binary compatible in /usr/share/nginx/modules/mod-http-image-filter.conf:1
nginx: configuration file /etc/nginx/nginx.conf test failed

拷贝so文件到原目录进行加载

1
cp *.so /usr/lib64/nginx/modules/

再次测试

1
the "ssl" directive is deprecated, use the "listen ... ssl" directive instead

注释配置文件中的ssl on;同时在listen 443; 后面加上 ssl

1
2
listen 443  ssl;
#ssl on;

再次测试

1
version 1.20.1 of nginx.pm is required, but 1.12.2 was found

find nginx.pm发现,这个perl文件,在make install的时候,也会安装,如果不指定安装目录,这个文件会默认安装到/usr/local/lib64/perl5/nginx.pm。
而nginx.pm里面记录了nginx的版本号。所以,如果启动nginx的时候,运行的nginx与nginx.pm版本号不一致就有问题

在测试的机器进行上述操作并进行install安装,把perl5下载到本服务器,把本地的目录进行备份,使用下载的perl5文件夹

再次测试

1
2
3
[root@idt01 objs]# nginx -t
nginx: the configuration file /etc/nginx/nginx.conf syntax is ok
nginx: configuration file /etc/nginx/nginx.conf test is successful

./configure: error: C compiler cc is not found

1
yum -y install gcc gcc-c++ autoconf automake make

./configure: error: the invalid value in –with-ld-opt=”-Wl,-z,relro -specs=/usr/lib/rpm/redhat/redhat-hardened-ld -Wl,-E”

1
yum -y install redhat-rpm-config.noarch

./configure: error: the HTTP rewrite module requires the PCRE library.

1
yum -y install pcre-devel

./configure: error: SSL modules require the OpenSSL library.

1
yum -y install openssl openssl-devel

./configure: error: the HTTP XSLT module requires the libxml2/libxslt

1
yum -y install libxml2 libxml2-dev libxslt-devel

./configure: error: the HTTP image filter module requires the GD library.

1
yum -y install gd-devel

./configure: error: perl module ExtUtils::Embed is required

1
yum -y install perl-devel perl-ExtUtils-Embed

./configure: error: the GeoIP module requires the GeoIP library.

1
yum -y install GeoIP GeoIP-devel GeoIP-data

./configure: error: the Google perftools module requires the Google perftools

1
yum -y install gperftools

[root@rancher modules]# nginx -t
nginx: [emerg] dlopen() “/usr/lib64/nginx/modules/ngx_http_kafka_module.so” failed (librdkafka.so.1: cannot open shared object file: No such file or directory) in /usr/share/nginx/modules/mod-kafka.conf:1

https://www.jianshu.com/p/635e8cde4cbc

参考文档:
https://blog.csdn.net/stormwolf/article/details/123371698

http://t.zoukankan.com/damon-blogs-p-14158831.html

https://blog.csdn.net/sayyy/article/details/121179039?utm_medium=distribute.pc_aggpage_search_result.none-task-blog-2~aggregatepage~first_rank_ecpm_v1~rank_v31_ecpm-6-121179039-null-null.pc_agg_new_rank&utm_term=nginx%E6%B7%BB%E5%8A%A0%E6%A8%A1%E5%9D%97stream&spm=1000.2123.3001.4430

为了使 Nginx 配置更易于维护,建议为每个服务创建一个单独的配置文件,存储在 /usr/local/nginx/website 目录,根据需求可以创建任意多个独立的配置文件。

独立的配置文件,建议遵循以下命名约定 <域名>.conf,比如域名是 nmk0718.com,那么你的配置文件的应该是这样的 /usr/local/nginx/website/www.nmk0718.com.conf,把location单独抽出放在/usr/local/nginx/include/www.nmk0718.com.conf中进行存储.再通过include进行引用
新增服务时,只需更改include中的配置文件机即可

1
2
3
4
5
6
[root@deployment nginx]# ll conf/website/
-rw-r--r--. 1 root root 416 Jun 10 2021 dev.nmk0718.com.conf
-rw-r--r--. 1 root root 7189 Mar 10 15:19 test.nmk0718.com.conf
[root@deployment nginx]# ll conf/include/
-rw-r--r--. 1 root root 13398 Mar 14 17:38 dev.nmk0718.com.conf
-rw-r--r--. 1 root root 14987 Feb 22 15:01 test.nmk0718.com.conf

Nginx 日志相关目录,内以 域名.type.log 命名(比如www.nmk0718.com.access.logwww.nmk0718.com.error.log )位于 /usr/local/nginx/log/ 目录中,为每个独立的服务配置不同的访问权限和错误日志文件,这样查找错误时,会更加方便快捷。

参考文档:
https://blog.csdn.net/Janson_Lin/article/details/105954705
https://www.cnblogs.com/cheyunhua/p/14011800.html
https://www.cnblogs.com/cuishuai/p/8073748.html
https://blog.csdn.net/zhanghui200920061988/article/details/105132167